The Super Famicom versions of RPG Maker did not have a sprite editor, meaning you were stuck with the medieval-looking default characters and couldn't make a game starring, say, Garfield. The second game (RPG Maker 2 / RPG Tsukūru 2), however, did have graphic packs that were downloadable via Satellaview, and those packs had extra characters. Characters that a sufficiently motivated nerd could, in theory, edit into other characters.
You see where this is going.

So here's a tutorial for adding not just custom characters, but custom character packs that basically amount to 16-bit era DLC. And yes, they work on a real console, if you're that motivated of a nerd.
Stuff you'll need:
- Ryouma de Yuku, an RPG Maker 2 add-on game originally downloadable via Satellaview (preserved thanks to Satellablog)
- BS-X Flash Manager, a program for editing Satellaview memory packs
- YY-CHR, a program for editing graphics in a ROM
- The sprite sheet for the character you want to insert into the game, no bigger than 16x24 pixels per sprite (the hundreds of A Link to the Past randomizer sprites available work, if you turn them into PNGs with ZSpriteTool and do some cutting and pasting)
- RPG Maker 2 itself and a way to play it that allows loading Satellaview memory packs, such as Snes9x, bsnes-plus, MiSTer FPGA, FXPAK PRO, or the actual cartridge if you have an empty Satellaview memory pack and a way to flash it (NOTE: don't you fucking dare do this if you haven't dumped that pack already, even if it appears to be empty)
STEP 1: Extract the Ryouma de Yuku Graphics Pack
Launch BS-X Flash Manager and open the Ryouma file you downloaded from Satellablog (Ryouma De Yuku - Complete Set.bs). It should look like this:

Select the second file on the left (the one that says 2 blocks), then go to File and click Export. This will create another .bs file with only the graphics pack and not the other Ryouma stuff. NOTE: If you skip this step you'll still be able to change the sprites, but they won't actually work in the game. Why? No idea! Just accept the mystery and don't skip this step.
STEP 2: Edit the Graphic Pack Sprites
Before getting started, take a look at the Ryouma de Yuku characters below and pick one whose colors more or less match your desired characters' colors:

(That one lady in the second row has a pretty Garfield-esque dress, for instance.)
Now launch YY-CHR and open the graphics pack .bs file you extracted in the previous step. You'll see nothing but nonsensical graphics with weird-ass colors, until you change these settings:
Format: 4BPP SNES/PCE(CG)
Pattern: 16x24
Address (click the red "ADDR 0x80" icon): 0001BC00
There, now you'll see sensical graphics with weird-ass colors. It should look like this:

At this point, changing the colors is technically optional -- nothing here will change what the colors in the game itself will look like, but seeing them as you would in the game will make the next part a lot easier. To see the correct colors, you need to load a ZSNES emulator save state created within RPG Maker 2. No, this won't work with a save state made in an emu created this century, for, once again, some reason. Yes, this is kind of a pain in the ass, so here's an RPG Maker 2 save state we made just for you. You're welcome.
Anyway, go ahead and click "Palette," then "Load Emulator State" and pick the one we provided. Now the colors will look... worse?!

Ah, but notice that the color palettes available on the lower right are now different. If you scroll down that list, you should find a palette that makes each character's colors match the ones in the game.

Scroll down the window on the left to find the character you settled on at the start of this step, then pick the right palette for them. In our case, here's the Garfield lady with her right palette:

Now look at the sprites for the character you want to add. We're using this Garfield sprite sheet by Jon Gandee and Hansungkee from Spriters Resource, hastily adapted for this tutorial by someone who clearly isn't a pixel artist. (PRO TIP: you can easily add a grid over your image by opening it in Paint and pressing Ctrl+G. Take a screenshot to be able to zoom in all the way.)

Now use the drawing tools on the right of YY-CHR and the colors on the palette to replicate each sprite over the existing ones, always over its equivalent position ("walking right" over "walking right," and so on). Click the second cog icon on the bottom (the one that says 32x32 by default) if you want to zoom in. Heeeeeere comes Garfield!

When you're done with a sprite, you can click the Copy button on the toolbar above to copy everything currently being shown on the right window, the Paste button to paste it over another sprite, and lastly Mirror Horizontal (the double arrow pointing left and right reminiscent of Nickelodeon's Catdog) to mirror it.

Once you've finished all the sprites, you can go to File and pick Save as to create yet another .bs file, which takes us to the next step...
STEP 3: Load the Graphics Pack in RPG Maker 2
Assuming you're using an emulator, because you almost definitely are, we recommend Snes9x over bsnes, since save states don't seem to work for RPG Maker 2 on the latter and you'll be needing a shitload of those if you actually want to play this game. In Snes9x, go to File, Load MultiCart, and pick your legitimately obtained RPG Maker 2 ROM on Slot A and the last .bs file you just created in Slot B, then click OK. (You can ignore the BIOS part for this game.)


If you like living on the edge and insist on using bsnes, go to System, Load Special, Load BS-X Slotted Cartridge, and set the two files just mentioned as Base cartridge and Slot cartridge respectively. The game should start now. Press A to go to main menu, then go to the second option ("EDIT" if you're using the English translation patch).

Now go to the last option ("DAT" in English), then the last option again ("MEM-PAK IMAGE DATA"). Press up to select the memory pack and A to confirm (this part is untranslated in the patch).

Press B to go back to the previous menu and go to the second option there ("PARTY"). Press A twice and that will take you to the Character Maker screen. This is, astonishing as it might seem, where you make characters for your game.
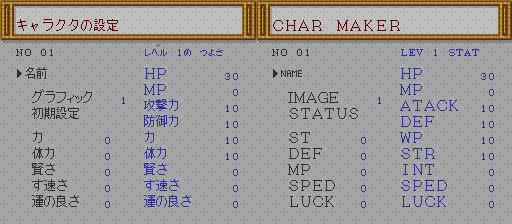
The first option in this screen is where you can name your character, so go for it if you want. In the Japanese version, press R twice to use the Latin alphabet. In the English translation, you start with the Latin alphabet and pressing R once will let you use lower case letters (not available in the Japanese version).

Press start to save the name and A to confirm. Now, at last, the reason we're here: goddamn Garfield. Pick the second option in the Character Maker screen ("IMAGE") and use the D-Pad to select a character. Your character will be among the last ones, so you'll probably want to start by pressing down. There's our boy!

Press A to select the character, B three times to leave, and A to save and exit the Character Maker. At this point you can start playing with the other options to make a game for your character -- or, if you just wanna see what it looks like in action with little effort, simply load someone else's RPG Maker 2 game, like one of the 11 existing English language ones from the '90s preserved at rmarchiv.de. These are always in SNES save ram format (.srm), so simply rename the file to match the name of the ROM, put it in the "saves" folder for Snes9x or the same folder as the ROM for bsnes, and repeat the process above to replace one of the characters in the game with your own.

NOTE: You'll need to load both files via the "Load MultiCart" or "Load Special" option every time you want to use the custom characters, but you only need to do the in-game memory pack loading/character selecting process the first time. You'll know you forgot to load the .bs file if your character is suddenly invisible.
NOTE 2: Be aware that this game's English translation is somewhat unstable and can randomly crash during fights, so you'll either have to save a lot (we weren't kidding about this game requiring shitloads of save states) or get used to navigating Japanese menus.
And that's it! You are now 1/10th of the way to creating your own SNES RPG Maker 2 character pack. In the words of Garfield himself:

If you make any games in this thing, with or without custom characters, let us know and we'll play them in our channel (most likely in test mode because we suck at RPGs, but still!).